Quick Start
Registration of datasets to MSD
In this tutorial we go through the steps needed to upload a dataset (i.e: 16S Sequences) to MSD one by one in order.
Creating Account
As MSD is a platform dedicated to needs of CRC1371 consortium. You need to be a member of CRC1371 consortium in order to use it.
In order to create you account at MSD follow the steps below:
Go to MSD
Click on Register.

Fill the Sign up form and click Create an account

Activate your account by clicking on the link sent to your email address.
5. You need to wait until MSD administrator approve your account. As your account is approved, you can start using MSD. You will be notified by an email after account approval.
Now you have your account activated, and you can log in.
Note
At MSD all kinds of Registration happen under Submit tab. Under this tab user can register Protocols, Projects, Organisms, Samples, Datasets (16S, 18S, ITS, Metabolomics, Transcriptomics, Proteomics, Metagenomics).
Defining Project
MSD database schema tries to comply with every usual research project which starts with defining a project. Similarly, the first step at MSD is also creation of a project to which all of the pertaining samples would be assigned. In order to that follow the steps below.
Under Submit tab:
Click on Project
Give your project a Name
If the project is already registered at SRA [1] and you have an accession assigned, you can give it as Accession field to the project.
You can also give the project an Acronym for ease of use. Leaving it empty means no acronym for you project.
Creator is the owner of project. You have to select your username.
You should give the project Description. The more details the description contains, the more your project will appear in searches for datasets within various projects you have.
Availability Checkbox will make other users of MSD able to see the description of the project in their Dashboard View and ask for permission to have access to the project datasets.
Click on Create Project to finalize the project creation.

An example of project creation form. After new project is created you will be redirected to 16S Datasets View.
Important
Acronym should be the project ID in CRC1371. It is crucial to keep the project acronym consistent with the project ID in CRC1371 for proper organization and tracking of projects across platforms.
Note
If the metadata is already stored at DIS (Data Integration System) and there are patient IDs given by DIS. Then the following steps are not needed and may be skipped up to Submitting Datasets as a DIS User.
Defining Protocols
Different projects might have different protocols for Sampling, Sequencing, Analysis, Preparation, etc. Each sample and dataset which is to be submitted to MSD should have a protocol assigned. Before registration of organisms, samples, and datasets to MSD you need to have the protocols you used for sample preparation, sampling as well as protocols used for Sequencing and Analysis.
There are already some common protocols available at MSD which you can view and download at Protocols View tab.
The definition of different proton helps you with protocol definition.
Preparation Protocol: This protocol refers to steps that were taken to prepare the organism sampling.
Sampling Protocol: This protocol refers to steps taken to get samples for measurement (i.e: sequencing).
Sequencing Protocol: This protocol refers to steps taken after sampling utility a library is prepared for sequencing. If the samples were sequenced by CFM [2] then do not define any Sequencing protocols, and use the one provided by MSD: Sequencing_protocol_Default
Analysis Protocol: This protocol refers to steps taken for processing the sample uploaded to MSD. As all of the 16S amplicon sequences get analyzed at MSD, it is not necessary to define any Analysis protocols and the standard provided by MSD: Analysis_protocol_Default can be used.

An example of protocol creation form.
If the protocol is an extension to other protocol, you can make it related to other protocol by clicking on Extension and choosing one of already submitted protocols at MSD.

An example of extending a protocol.
Defining Organisms
So far the prerequisites to registration of Organisms, Samples and Datasets are submitted. Registration of Organism and then Samples always comes before datasets. It is recommended that you define organisms for the experiment at MSD during the start of the project and that you define samples at MSD for each sampling attempt. Having done that will help not only by tracking and documenting the project but also by registration of datasets.
In order to register the organisms you need to follow three major steps. Firstly you need to Create Template and then Register Template. For registration of Samples and Datasets these two major steps are followed as well.
Note
Go to Submit tab -> Organisms subtab, in order to submit the samples and make the relation to their corresponding organisms.
I. Create Template
You will see the various metadata tabs including General Required Metadata, Human Required Metadata, and Mouse Required Metadata.
General Required Metadata: Under this tab there are general metadata required for each organism getting registered at MSD
Human Required Metadata: Metadata specific to human organisms.
Mouse Required Metadata: Metadata specific to mouse organisms.
Note
Currently, all metadata attributes are preselected. We continue with preselected attributes, and we later provide only related metadata.

Clicking on Create Organism Template will download an Excel template.
II. Fill in the Template
In order to introduce the organisms to MSD, the rows of the downloaded Excel must be filled with the selected metadata as columns.
Note
Please be careful to open the Excel file with English Excel and NOT the German Excel.
The description of each column is below:
General Required Metadata
External_ID: If the organism has been registered on any other platform and has an ID, then you can fill this cell with that ID. This field is not required.
MSD_ID: If a value for this cell is provided MSD tries to find that organism with given MSD_ID and update its Metadata with current given metadata in the Excel. Organisms View contains the information about the registered organisms.
Name: The name you want to give to the organism.
Description: Add some extra information to the organism. It will help you later to filter them.
Project_ID: The MSD ID of the project this organism belongs to. Projects Overview contains the information about all of your uploaded projects.
Species: This cell should contain the scientific name of type of the organism you are defining. There are three options: Mus Musculus, Sus Scrofa, Homo sapiens. Note: Currently pig organism are not supported.
Sex: The sex of the organism : Male or Female

Human Required Metadata
According to the type of organism you are submitting the related metadata should be saved . If you are defining human organisms, fill the following metadata:
Place of Birth: Choose related regions from the drop-down menu.
Medical History: If there is specific information about the medical history of the organism then add it here. No more than 100 characters.
IBD: If the organism has been diagnosed with IBD. Yes or No
Cancer: If the organism has been diagnosed with cancer. Yes or No

Mouse Required Metadata
If you are submitting mouse organisms then fill the following only.
General Genotype: Choose genotype of the organism from the drop-down list.
Genetic Modification: Choose type of genetic modification from the drop-down list.
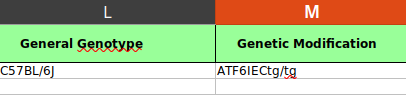
An example of filled row for these metadata.
The figure below shows an example of defining 3 mice and 2 human organisms to a project defined in Defining Project. After finding the Project_ID of the project the organisms will be defined in the Protocols View.
The 5 rows for 5 organisms will be filled but as they belong to different species the rows will be filled differently as below.
Note
Pay attention that for the sake of better representation relative columns are not shown.

Columns A to G contain metadata and have values for any type of organism you are uploading. The first three rows belong to mice organisms, and they have values for mice-specific metadata so that they are only filled for mice organisms and left blank for human organisms. Columns H to K are not shown in this figure.

Columns A to G contain metadata and have values for any type of organism you are uploading. The last two rows belong to human organisms, and they have values for human-specific metadata so that they are only filled for human organisms and left blank for mice organisms. Columns L and M are not shown in this figure.
III. Uploading Template
As we have our organism template filled with related values, it’s time to upload the template to MSD. In order to do so we go to Submit tab -> Organisms -> Register Template. By clicking on Browse we
choose filled organism_template.xlsx and then click on Upload Organisms.

After clicking on Upload Organisms you will be shown a message and redirected to Dataset Register. In the Organisms newly uploaded oranisms will be shown.
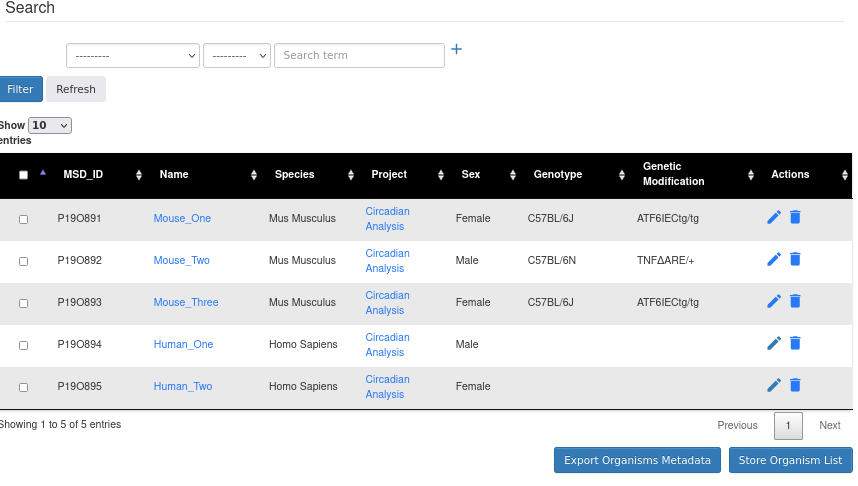
For explanation of the table see Organisms View.
Defining Samples
So far we have some organisms like above registered at MSD. It’s time now to define samples which we have taken from these organisms. The process of sample registration follows the general registration approach in MSD.
In order to register the organisms you need to follow three major steps. Firstly Create Template, then Fill the Template, and then Register Template. The same as registration of organisms which we did in previous section.
Note
In order to submit the samples and make the relation to their corresponding organisms, go to Submit tab in top bar -> Samples subtab.
I. Create Template
Under Samples subtab there will be other tabs named Sample Required Metadata, Optional Human Metadata, and Optional Mouse/Pig Metadata. Below is the description description of each:
Sample Required Metadata: Under this tab there are all metadata entries that are required for each sample to be registered at MSD. They are automatically preselected.
Optional Human Metadata: Under this tab there are all metadata entries relevant to each sample derived from human. You can select which metadata entries will be stored in the databse.
Optional Mouse/Pig Metadata: Under this tab there are all metadata entries relevant to each sample derived from mouse or pig. You can select which metadata entries will be stored in the databse.
Note
The metadata values not provided by the user a default value would be assigned in the database.
Note
All optional metadata entries will have choices for values in the Excel template.
After the desired metadata has been configured, it’s time to create an Excel template with desired columns representing the chosen entries. To do so click on Create Sample Template button.
An example in the figure below, creates a template to submit both human and mouse samples to organisms defined in Defining Organisms part.
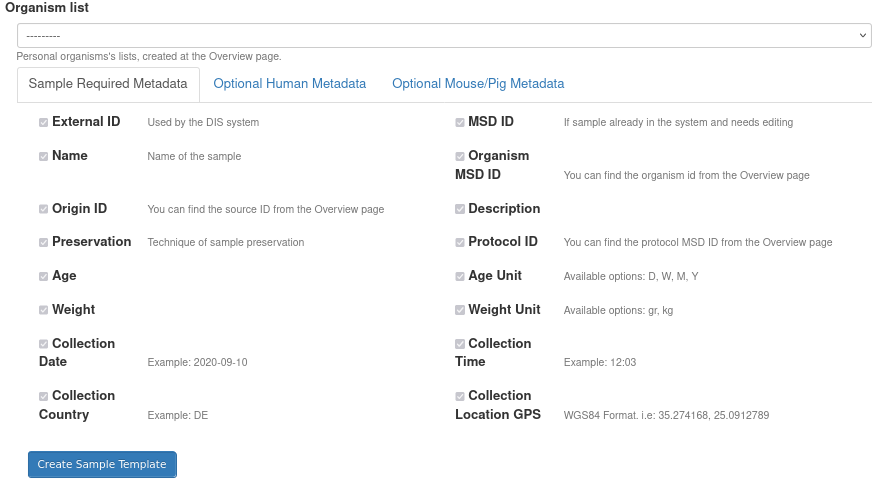
All required sample metadata entries are already selected.
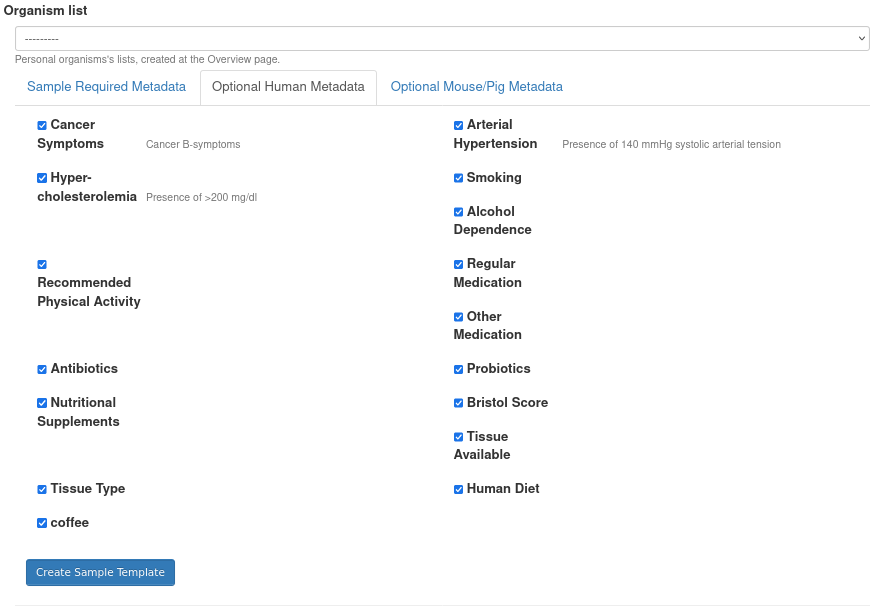
You can select any number of human-related metadata entries and create an Excel containing this metadata as columns to fill.
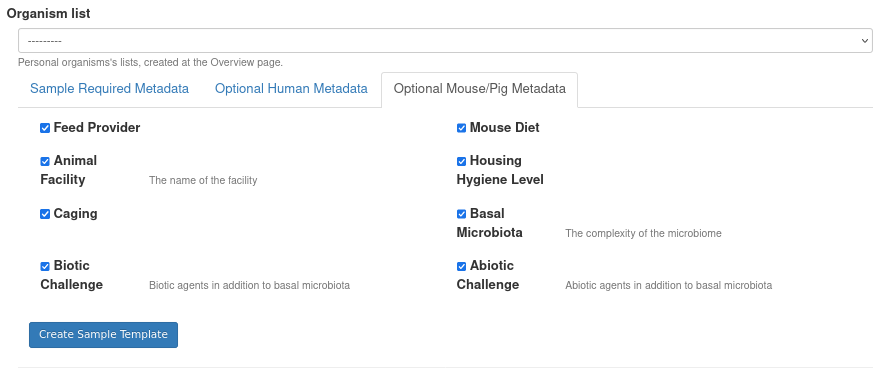
You can select any number of mouse-related metadata entries and create an Excel containing these metadata as columns to fill.
Now that the metadata is selected, a pool of the samples to upload should be provided, click on Create Sample Template button to download the Excel template with the desired metadata to be filled.
II. Fill in the Template
Now there is an Excel template with columns being the metadata chosen in the previous step. For each row that is a sample provide the corresponding values.
Note
Please be careful to open the Excel file with English Excel and NOT the German Excel.
The descriptions of different metadata entries are listed below:
Required Sample Metadata
Note
All sample metadata corresponds to the value at the time of sampling. For example, if the organism (human) used to smoke regularly when the sampling took place, then the value of “smoking” column for the samples taken place then should be YES.
External_ID: The external ID to the sample if it is registered in other platforms such as SRA [1]. If it’s not registered to any platform then leave it blak.
MSD_ID: If you want to modify metadata of the samples already registered, you can put their MSD ID here and fill the column values. Doing so will tell MSD to update the metdata of the sample with provided MSD ID with new ones you are providing in this Excel template.
Name: The name you want to give to the sample. It should be unique throughout all samples registered in the project to which origin organism belongs.
Description: A description of for the sample. It will make it easier to search through the samples using Advanced Search feature.
ORID: ORID stands for “Ori**gin **ID”. This ID tells MSD from which part the sample comes from. In order to get this ID you need to use the search box in Origin View. The ORID of the sample is to be copied to this cell. For example, 1.3.7 is the ID of saliva (material) taken from Salivary Gland (localization) in mouth (organ). You can choose this ORID from the drop-down menu.
Organism_ID: The MSD ID of the organism from which the sample was taken. Organism View contains all of the organisms for the project. You can choose the organism MSD ID from the drop-down menu.
Weight: Weight of the sample.
Weight_Unit: The unit of Weight of the sample.
Age: Age of the organism at time of sampling.
Age_Unit: The unit of Age.
Preservation: Type of sample preservation you have used for preserving the taken samples. Choose from drop-down menu.
Sampling_Protocol_ID: The sampling protocol that was used for sampling and registered in Defining Protocols step.
Collection_Date: Date of sampling in the YYYY-MM-DD format.
Collection_Time: Time of sampling in the HH:MM format.
Collection_Country: The country where the sampling has taken place. It should be a two-letter standard code of the country according to ISO_3166.
Collection_Location_(GPS): The coordinates of the Sample Collection Location. Please watch this tutorial video about how to find the latitude and longitude on google maps: video. The format is like: Latitude, Longitude. For example: 48.39814451278265, 11.737600673415221
Human Sample Metadata
cancer_related_symptoms: “Yes”, “No”, or not assigned (“NA”). Choose from the drop-down menu.
arterial_hypertension: “Yes”, “No”, or not assigned (“NA”). Choose from the drop-down menu.
hypercholesterolemia: “Yes”, “No”, or not assigned (“NA”). Choose from the drop-down menu.
smoking: “Yes”, “No”, or not assigned (“NA”). Choose from the drop-down menu.
alcohol_dependance: “Yes”, “No”, or not assigned (“NA”). Choose from the drop-down menu.
physical_activity: “Yes”, “No”, or not assigned (“NA”). Choose from the drop-down menu.
regular_medication: “Yes” or “No”. Choose from the drop-down menu.
regular_medication_categories: If the value of regular_medication columns is “Yes” choose one option here. Otherwise, leave it blank.
antibiotics: “Yes” or “No”. Choose from the drop-down menu.
probiotics: “Yes” or “No”. Choose from the drop-down menu.
supplements: “Yes” or “No”. Choose from the drop-down menu.
bristol_score: The bristol score for stool samples. If the sample is not stool, leave it blank.
tissue_available: “Yes” or “No”. Choose from the drop-down menu. If there is still some tissue, from which samples are taken, stored.
tissue_type: Which method was used for taking tissue. “Biopsy” or “Resection”
human_diet_category: To which diet category can the patient be assigned at the time of sampling.
coffee: “Yes”, “No”, or not assigned (“NA”). If the patient was taking coffee at the time of sampling.
Mouse/Pig Sample Metadata
feed_provider: Type of feed provider. “Sniff”, “Altromin” and “Other”
mouse_diet_category: Type of diet the which the organism (mouse) was taking at time of sampling.
animal_facility: To which animal facility within CRC, the organism is coming. Choose from the drop-down menu.
housing_hygiene_level: Choose from the drop-down menu.
caging: Type of caging. Choose from the drop-down menu.
basal_microbiota: Choose from the drop-down menu.
biotic_challenge: Choose from the drop-down menu.
abiotic_challenge: Choose from the drop-down menu.
Custom Sample Metadata
After all the columns of selected metadata you can place any number of custom metadata columns with any name and provide related value to them for each of the samples. These custom metadata entries are stored and available for export for downstream analysis.
Custom_1: You can rename these default columns to hold metadata entry to any name.
Custom_1: You can rename these default columns to hold metadata entry to any name.
You can also add any number of columns after all MSD standard metadata and provide values for them.
You see and example of filled sample template Excel below:
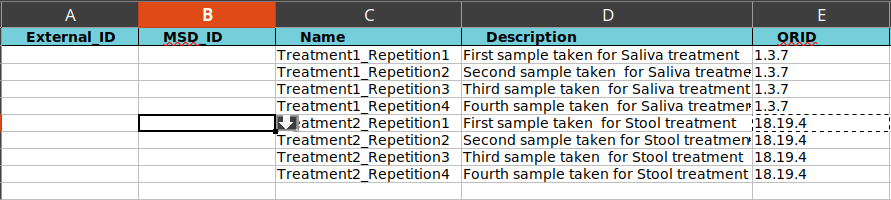
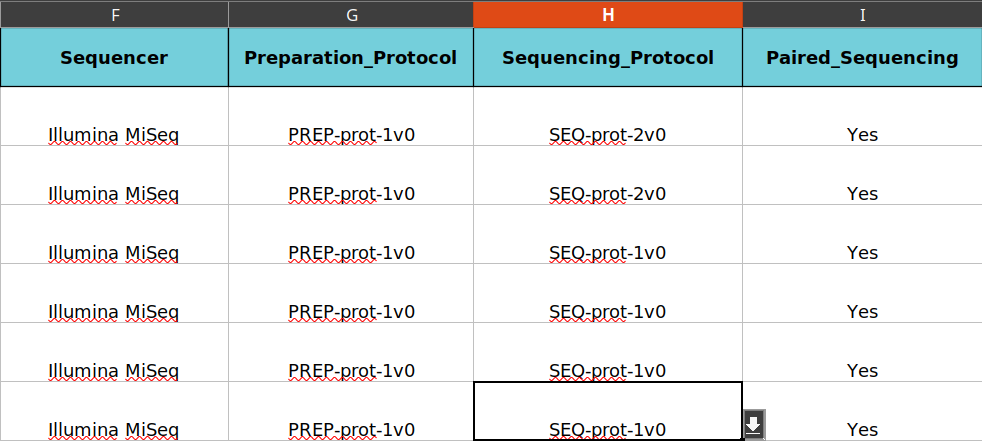
Eight new samples with no External_ID are going to get uploaded. Values until ORID columns. the first four rows are mouse samples and the rest human samples.

The same samples as prevoius figure. Filled from Organims_ID to Preservation. the first four rows are mouse samples and the rest human samples.

The same samples as prevoius figure. Filled from Sampling_Protocol_ID to Collection_Location_(GPS). the first four rows are mouse samples and the rest human samples.

The same samples as prevoius figure. Filled from cancer_related_symptoms to alcohol_dependance. the first four rows are mouse samples and the rest human samples. Since the first four samples are mouse samples we leave their cells empty for human metadata.
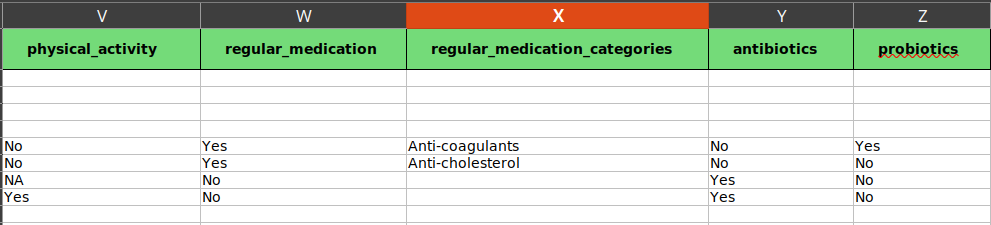
The same samples as prevoius figure. Filled from physical_activity to probiotics. the first four rows are mouse samples and the rest human samples. Since the first four samples are mouse samples we leave their cells empty for human metadata.
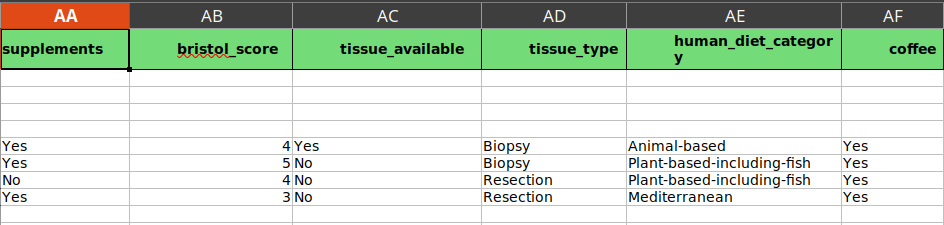
The same samples as prevoius figure. Filled from supplements to coffee. the first four rows are mouse samples and the rest human samples. Since the first four samples are mouse samples we leave their cells empty for human metadata.

The same samples as prevoius figure. Filled from feed_provider to caging. the first four rows are mouse samples and the rest human samples. Since the last four samples are human samples we leave their cells empty for mouse metadata.
The same samples as prevoius figure. Filled from basal_microbiota to Custom_2. the first four rows are mouse samples and the rest human samples. Since the last four samples are human samples we leave their cells empty for mouse metadata.
III. Uploading Template
Now that we have filled the Excel template it’s time to upload it and register our samples to MSD. In order to upload the filled Excel you need to go to Submit tab -> Samples sub-tab -> Register Template. There you can Browse your computer for the filled Excel template, clicking Upload Samples button will introduce the samples to MSD.

When the sample uploading is done, a message will be shown like “Your samples have been successfully uploaded!” and you will be redirected to 16S Datasets View
16S Dataset Registration
So far organisms and samples taken from them are registered at MSD, and it’s time to register datasets produced from samples. As explained in MSD Database Structure, from each sample taken several datasets could be produced. For example, sample by biopsy allows to produce 16S rRNA gene amplicon dataset by sending some of it for sequencing and it allows to produce from the same sample producing metabolomics data.
In this part we explain the last step of dataset registration for 16S rRNA amplicon sequences.
The steps we take, as it was for sample and organism registration, are Creating a template, Filling the template, Preparation of fastq files,and Uploading the template. For dataset uploading, we also upload the raw files needed to get processed with the template.
I. Create Template
16S rRNA datasets Excel template can be created by going to Submit tab -> Datasets subtab -> 16S -> Create Template. Click on Create Dataset Template will have an Excel template downloaded.
II. Fill in the Template
Now that we have the Excel template download we need to fill each of rows in the Excel template for each dataset produced from the sample.
Note
The first two columns of dataset Excel template are important (DIS_Sampling_ID and Sample_ID). For each uploaded dataset both or one of them should be provided. - Providing only DIS_Sampling_ID: implies retrieval of metatada automatically from DIS and registration of related organisms and samples. Therefore, there is no need to follow Defining Organisms and Defining Samples steps. - Providing only Sample_ID: implies that the uploaded dataset belongs to the sample with provided MSD Sample ID (P1O34S3). - Providing both: implies updating a sample already registered at MSD (having MSD Sample ID) with metadata derived automatically from DIS.
Below is the description of each column and their valid values:
DIS_Sampling_ID: In case it is a human dataset belonging to a patient whose metadata is already stored at Data Integration System (DIS), DIS Sampling ID should be provided in this column. In any other cases should be left empty. DIS ID looks like MTXXX1234. It starts with MT followed by three other letters and 4 digits at the end.
Sample_ID: If this dataset belongs to a sample already registered at MSD. Either this metadata or DIS_Sampling_ID or both of them is necessary.
Name: Desired dataset name. It helps finding the dataset later in 16S Datasets View.
Target_Gene: From drop-down menu choose 16S.
Accession: If the dataset is already registered at some public repositories such as SRA [1] provide the relevant information here. Otherwise, leave it blank.
Sequencer: Choose the type of sequencing machine from the drop-down menu.
Preparation_Protocol: In this drop-down menu there is a list of preparation protocols that were submitted at Defining Protocols.
Sequencing_Protocol: In this drop-down menu there is a list of sequencing protocols that were submitted at Defining Protocols.
Paired_Sequencing: If sequencing data is paired-end, then choose Yes. It means there should be two files one for forward and one for reverse reads both of which will need to get referenced later.
Forward_Filename: If the sequencing layout is paired-end then forward sequence read file’s name goes here. Provide the exact and full name of the file. If the samples were not sequenced paired-end, then put a single sequncing file full name here.
Backward_Filename: If the sequencing layout is not paried-end then there is no need to provide a file name here. Otherwise, provide the full name of the reverse reads file.
Target_Region: Which region of Target_Gene was targeted for creating amplicon. For example, for 16S rRNA gene any choice of nine variable regions (V1 to V9) could go here. This information is to be retrieved from the sequencing facility.
DNA_Isolation: Choose the DNA Isolation methods used for the samples before sequencing from the drop-down menu.
Forward_Primer: Choose the forward primer used for sequencing library preparation. This information is to be retrieved from the sequencing facility.
Forward_Primer_Seq: This will be the sequence of the chosen forward primer. It gets selected according to Forward_Primer value automatically.
Reverse_Primer: Choose the reverse primer used for sequencing library preparation. This information is to be retrieved from the sequencing facility.
Reverse_Primer_Seq: This will be the sequence of the chosen reverse primer. It gets selected according to Forward_Primer value automatically.
Run_Length: Run length for the sequencing run. Choose from drop-down menu. This information is to be retrieved from the sequencing facility.
Amplification_Steps: Valid values here are 1 or 2.
First_Step: The number of PCR cycles for the first step (even if there was only on step) of PCR amplification.
Second_Step: The number of PCR cycles for the second step of PCR amplification, if the were two steps of amplification.
Reads_Number: Total number of reads for the dataset. It can be left blank.
Spike_Amount(ng): If the dataset has been spiked, put the amount of spike in Nanogram here. Otherwise put 0 value.
Sample_Weight(g): Weight of the sample taken for library preparation in grams. This information is to be retrieved from the sequencing facility.
If the information is not available just put 1 here.
Sample_Type: Type of sample sent for sequencing.
Custom_1: After Sample_Type column it is possible to add desired columns and corresponding values to each of the datasets and have them stored at MSD.
Custom_2: After Sample_Type column it is possible to add desired columns and corresponding values to each of the datasets and have them stored at MSD.
III. Preparation of fastq files.
Now that the template is ready. It’s time to prepare zip file of the fastq files for uploading. The zip file should contain all fastq files referenced in the Excel template so either Forward_Filename and Backward_Filename or a single file for single end sequencing. The zip file must NOT contain any folders inside. By opening the zip file it should be possible to see the fastq (or fastq.gz) files directly.
An example of filled dataset in Excel as below:
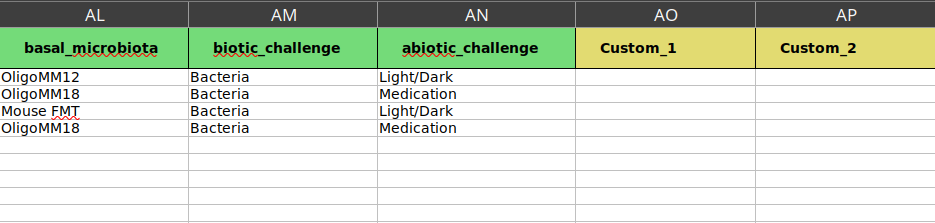
The first three datasets have MSD Sample ID (i.e: P1O273S155) and the last three does not have MSD Sample ID which means that they are coming from human organisms whose metadata is already stored at DIS. The last three datasets would be created after their data is retrieved from DIS and related MSD organisms and samples will be created. The first three datasets are going to be assigned to already registered samples.
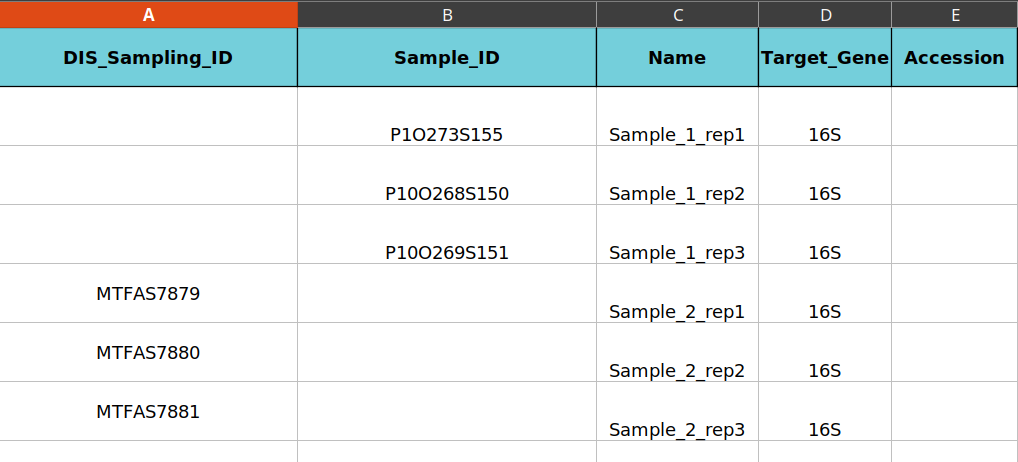
All datasets have been sequenced with Illumina MiSeq machine, same preparation protocol, same sequencing protocol and all of them are paired-end.

Forward file name and Reverse file name provided. Note that the full name of files is given. The sequencing has targeted V3-V4 region.

As all datasets have been sequenced with the same protocol and same facility, the forward and reverse primer used are the same. Note that there is no need to choose primers sequences as they would be automatically chosen according to the chosen primers names.
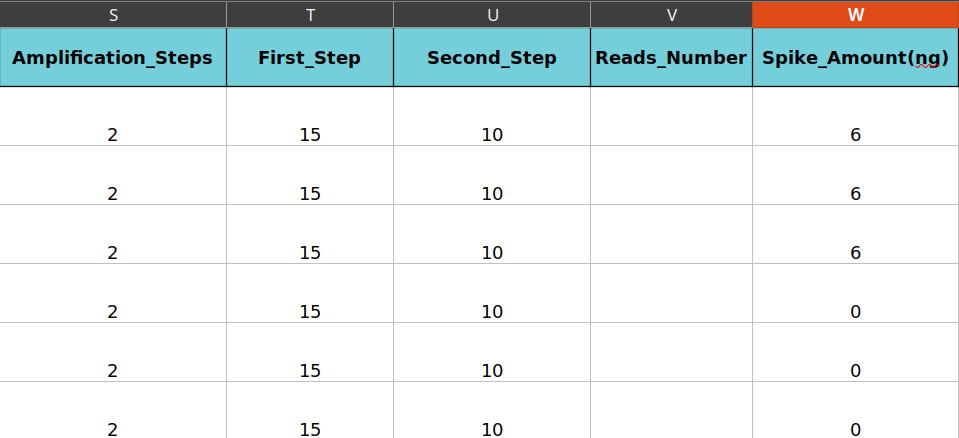
Two amplification steps for library preparation (PCR) with 15 and 10 cycles for the two steps, respectively. Reads number are not known and the first three datasets were spiked and the rest not, so that the amount of 6 Nanograms has been put for the first three and amount of 0 Nanogram for non-spiked ones.
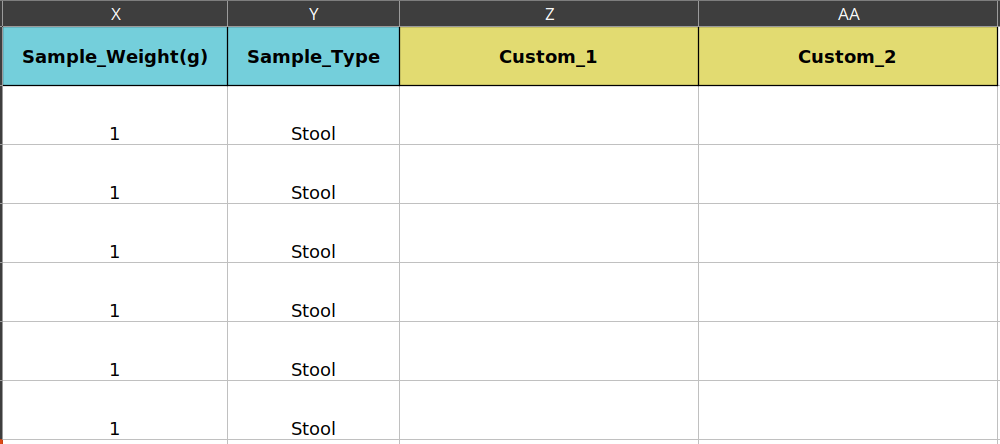
Sample type and weight taken for sequencing for all datasets is provided (ask for this information from the sequencing facility). After Sample_Type column new custom columns with desired names and values for each dataset can be added to have them stored at MSD. In this example there is no additional metadata, but it can be provided after Sample_Type column.
IV. Uploading Template
It’s time to upload the Excel template and the zip file containing all the fastq (or fastq.gz) files.
Metabolomics Dataset Registration
Defining a Metabolomic Run
Note
This section applies to metabolomics facility operators or members. Here the analysis run preformed at metabolomics facility gets registered and given an ID. If you are a scientist using MSD and need to upload metabolomics dataset to your samples then please read Registration of Metabolites (Targeted Metabolomics).
In order to submit the metabolomics runs to MSD you need to follow the steps as below:
1. Make sure that your account has been added to metabolomics group operators. If it is not added to the group please contact MSD administrator to do so.
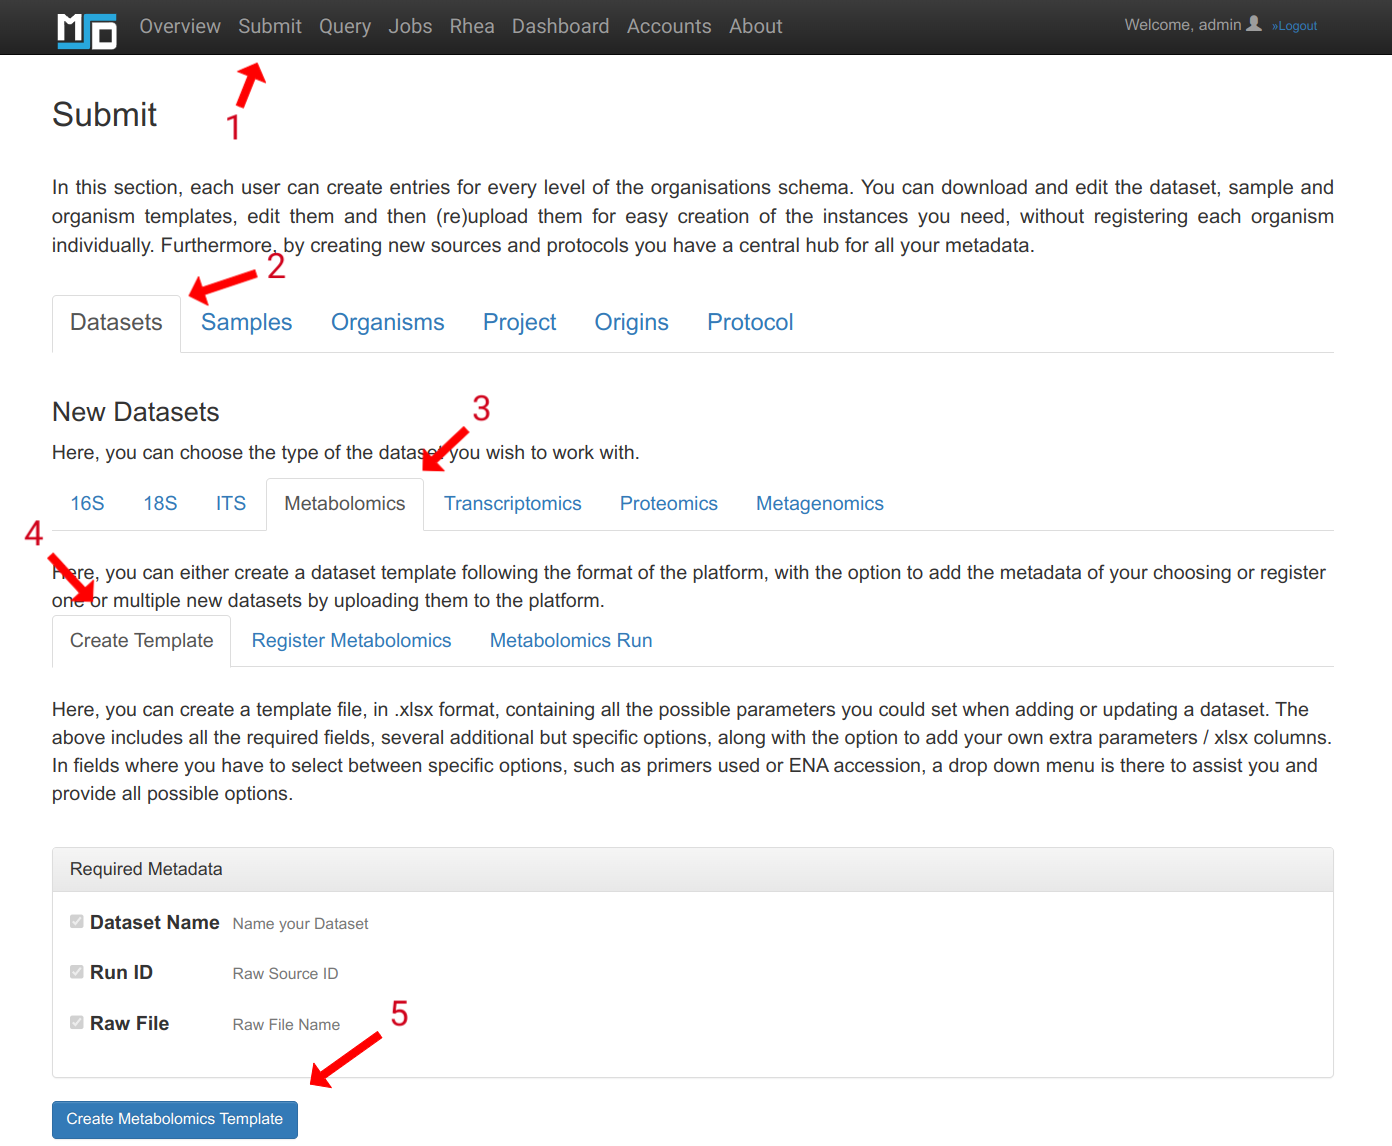
Log in with your user account and navigate to Submit/Datasets/Metabolomics as shown below:

This figure shows the navigation path to the metabolomics run submission tab.
3. Click on Metabolomics Run tab. There will be a table with all the metabolomics runs submitted to MSD. The status of each run is displayed there in the table including RUN_ID, Name, Wiff, Scan, Submitter, Upload Date, and Action.
By clicking on delete icon beside the Wiff file the uploaded file be deleted. Also, you can use download, delete, and edit to manage the run entry.
For adding new run fill the form as shown below and click on Save Metabolomics Run button.
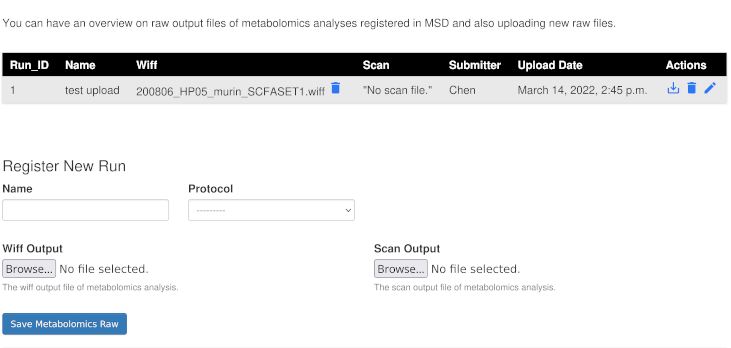
This figure shows the form for submitting a new metabolomics run. Adding Wiff and Scan output will help managing running and storing your files at MSD.
Registration of Metabolites (Targeted Metabolomics)
As explained here, different types of datasets can be assigned to one specific sample (See Sample Submission). In order to add measured metabolites to the samples you need to follow the steps as below:
1. Submission and assignment of the samples to related organisms in one of the projects. After registering the samples, each will be given a sample ID
(See view samples).
Sending the sample material for metabolites measurement.
Note
It’s recommended to submit the samples before sending the material to metabolomics lab and use MSD Sample IDs (e.g: P10O252S134) as identifier of the samples in metabolomics runs.
3. Receive metabolites Excel files of the metabolites’ measurement requests from metabolomics runs. Below there are two example files as if they are from metabolomics facility.
Metabolites Excel files should have columns described as below and an extra row below column headers containing units of measurements for each metabolite.
Excel Template Columns:
- Sample_ID: This column holds the MSD ID of the samples to be used in order to assign upcoming
metabolites in the file to proper samples at MSD. MSD knows these samples by these IDs so that if the wrong MSD ID is provided then metabolites in this Excel won’t be assigned to ther registered sample at MSD. NOTE the second row of this column is empty.Normalization: The normalization method which the metabolomics facility used for normalization. NOTE the second row of this column is empty.
- Metabolites Columns: From column C metabolites names should be in a first row (i.e: header)
and the unit of values in the next row. There should be values of the corresponding metabolites in the rows related to each of the samples. In case of not having values for a specific metabolite in a sample value N/A should be placed. (See figure of second metabolites example Excel)
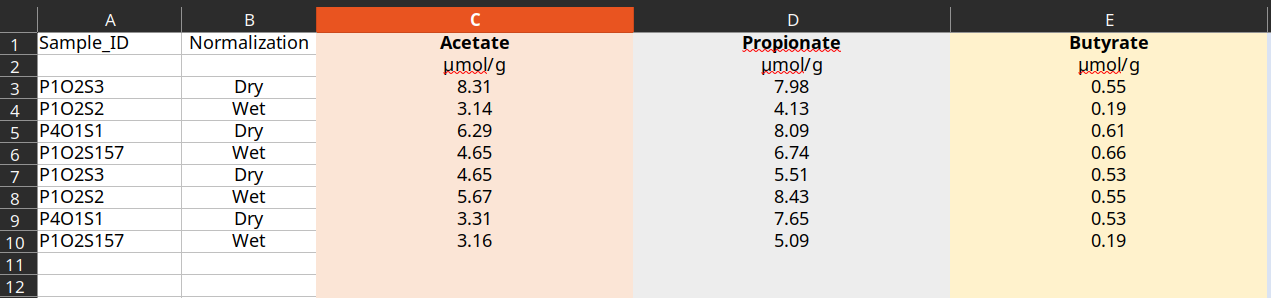
This figure shows an example of a typical metabolites Excel received from metabolomics center.

Another example of metabolites Excel with custom added metabolites in the last column.
Compress all metabolites Excels that should be uploaded into a zip file.
Example zip filehere:
Metabolites Zip
Note
Make sure that the first column has the MSD ID for the samples in the metabolites Excel. MSD will use these IDs to relate the metabolites to proper samples of the project.
5. Download metabolomics data submission template. You can follow the steps as shown in the picture to download it.
6. Fill out the metabolomics data submission template. The template has three main columns explained as below:
Excel Template Columns: - Dataset_Name: This name will be prepended to the name of samples from the metabolites Excel given as File_Name. Imagine the dataset has the following name “Measurement-1-Project-1” (as shown in the figure above) and content of “MetabolitesExample1.xlsx” is as shown in Metabolites Excel 1. When the dataset is submitted to MSD it will take name of the first sample (the sample with ID of P10O2S3) and prepend it with the value given as Dataset_Name. If the name of sample (P10O2S3) is TM7258_B3 then the name of corresponding metabolomics dataset for this sample will be Measurement-1-Project-1_TM7258_B3. It means that there will be a row in metabolomics dataset table with a name as Measurement-1-Project-1_TM7258_B3 which includes all the metabolites assigned to sample with ID of P10O2S3 in Metabolites Excel 1 .
- RUN_ID: This cell should be a drop-down choice list containing Run IDs submitted by metabolomics facility
to MSD (refer to :ref:` Submission of Run IDs <Submission of Metabolomics Runs>`). Ask metabolomics facility which did this measurements for this ID then choose the correct ID for the dataset. By this ID we relate the dataset to proper raw run files submitted by metabolomics facility.
Note
If you are using Excel program with default language other than English version, the drop-down might not work due to translation of formulas. In this case, you can refer to Sheet 2 of the Excel and find valid Run IDs under a column named Raw Sources ID.
- File_Name: These columns establish a relation between metabolites Excel files containing metabolites and sample IDs
to the Dataset_Name and RUN_ID. MSD will look in the zip file containing the metabolites Excel files and tries to find the given file name under this column there. Then it parses the metabolites in the metabolites Excel files and assign them to proper metabolomics run (i.e: RUN_ID) and metabolomic dataset name (i.e: Dataset_Name)

Upload the compressed metabolites Excel files and metabolomics dataset submission template.
As it’s shown in the screenshot below upload the zip file containing the metabolite Excels and a mapping Excel for submission as described above.
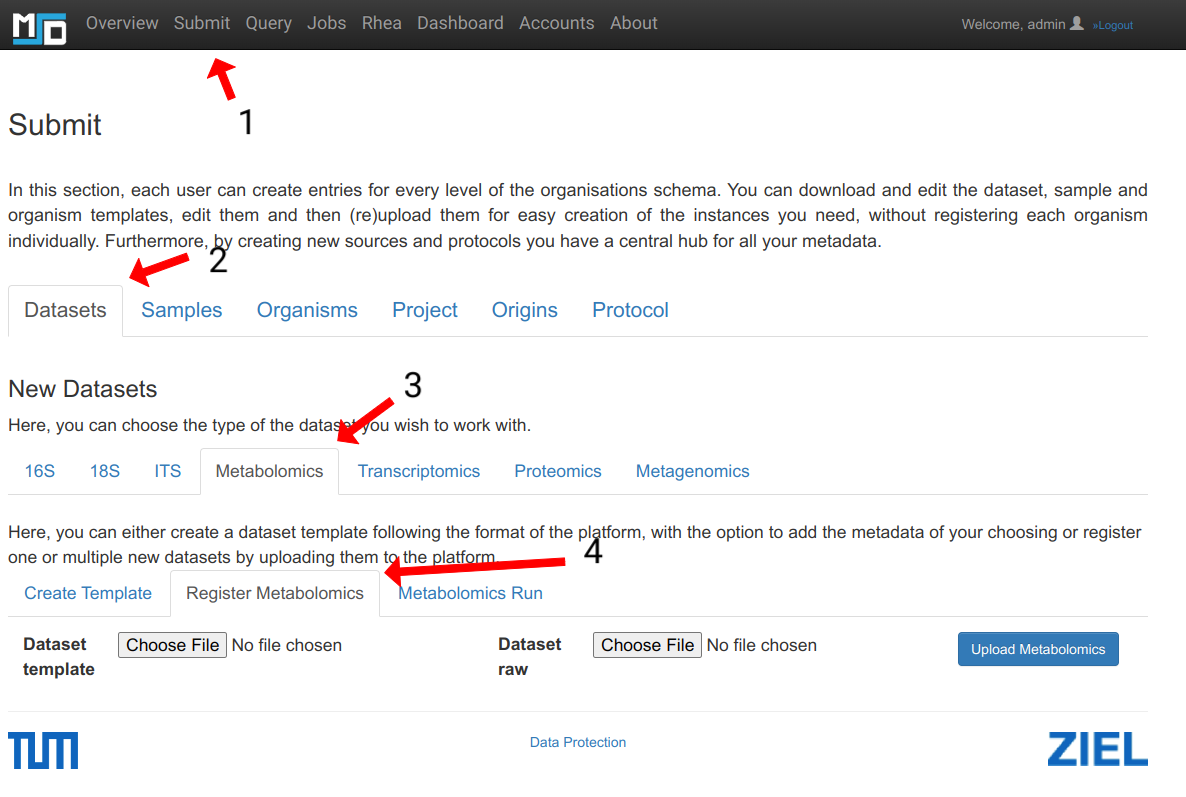
There are two fields for files. Dataset template: here the filled template mapping metabolites Excel files to RUN_ID and Dataset_Name is upploaded:ref:Metabolomics Dataset Template <Metabolomics Dataset Template> Dataset raw: Here the zip file containing all metabolites Excel is uploaded (e.g: Example of metabolites Excel)
When the upload is finished Metabolomics View will contain all of the metabolites datasets submitted to MSD.
Footnotes